Little Needle Felted Penguins

I’m always up for trying new things, me. When it comes to crafts, I’m forever filling my with ideas and interesting projects which I know I’ll sadly never complete, but a girl’s gotta dream, and that’s the whole point of Pinterest, right?

So when an email dropped into my inbox asking if I’d like to test out Hobbycraft’s range of Kirstie Allsopp craft kits, I jumped at the opportunity to flex my creative muscles. I was given a choice from the full range that they stock – everything from candle making, to pin cushion making to pyrography (!), but I opted for a craft which I’ve been longing to have a go at for ages, and never quite knew where to start – needle felting.

Kirstie Allsopp Needle Felting Kit

The kit is pretty brilliant. For the price (currently 25% off!) you get loads of bundles of fluffy coloured wool, felting needles, a felting tool and sponge mat. If I had one criticism, it would be that the instructions are a little sparse – it gives you basic instructions on how to make simple felt balls, but there’s little in the way of photos to show you what to do. Help was at hand though, in the form of YouTube, where there are a wealth of informative videos. I love you, internet. Even a simple Google search will throw up a handy video with what to do to get going.

All that needle felting is, it transpired, is fusing the fibres of the wool together by repeatedly stabbing it with your felting needle. After testing the water (and clumsily snapping my needle, those things are D-E-L-I-C-A-T-E) making a little ball like the pamphlet told me, I fancied making something a little more testing, and set about making one of my favourite cartoon penguins, Gunter from Adventure Time.

Needle Felted Penguin

Now, he may not be perfect, but for a first attempt at a new craft I don’t think I’ve done badly. The trick is to keep going and keep going (stab stab stab), because the finished product needs to be really firm and fused together. I think I just stopped short of getting it right with this guy, but I know for next time.

I’m a little bit addicted to needle felting now! I made the mistake of Googling ‘Adventure Time Needle Felt’ and now I think Peppermint Butler might have to be my next creation.
Watch this space!

Posted in craft / Tagged adventure time, Craft, DIY, gunter, hobbycraft, homemade, kirstie allsopp, needle felting, sponsored / 1 Comment

Turtle Mat Christmas Jumper Competition

Turtle Mat Christmas Jumper Competition
It was a bit windy on the harbour today. Me hat nearly blew off.
Turtle Mat Christmas Jumper Competition

To celebrate the launch of the very festive themed new range of products (hooray!), the lovely folks at Turtle Mat set us crafty bloggers a challenge of creating an eye-catching Christmas jumper with a blank canvas and a budget of £5.

After much head scratching, and some Pinterest trawling, I settled on the idea of a polar bear, and so bought as much white fleece as I could with my little budget, and fashioned this curvy-looking chap on the front of the jumper supplied to me by Turtle Mat. After drawing a vague shape, cutting it out and badly sewing it to the front of my jumper I then took up my trusty embroidery floss to give this guy a nose, eyes, and fill in his teeny tiny little ears a bit.

I’ve never actually owned a Christmas jumper before (I KNOW!), so I’m pretty pleased that my very first one is something that I’ve fashioned myself. Me and my new pal David (Tom decided to call him David for some reason) went for a very blustery walk up and down the harbour this afternoon, and I had to hang on to my hat!

Do you like my creation? What would you do with a blank canvas and a fiver?!

Posted in craft / Tagged Christmas, competition, Craft, DIY, sponsored, turtle mat, xmas / 2 Comments

DIY: Easy Handmade Christmas Gift Ideas

It’s beginning to look a lot like Christmas…

Seriously, everywhere I look there are Starbucks red cups, chunky knits, festive lights switch-ons, and a bitter foggy mist in the air. Christmas is only just over a month away (AAAAAAHHHH!) and if, like me, you haven’t started your Christmas shopping yet, then its time to raid those craft drawers, dig out those Sharpies, and get Christmas craftin’.

I’ve been compiling a list of easy-peasy festive DIYs that I know anyone would be happy to unwrap on Christmas morning. Not only do these save you pennies, it’s nice to give something handmade, plus you’re bound to have loads of fun making them.

1. Zip Pouch Tutorial
zip-pouch-diy
First up is this rather adorable looking ‘zipper pouch’ – super easy to make, with only a few supplies needed. Either fill with Christmas treats like chocolate coins, or make a mini travel kit with a face spray, lip balm, pocket mirror and hand gel. Find the instructions here.

2. Jumper Mittens
sweater mittens
Utilise those old raggedy pullovers and turn them into jazzy mittens! Only takes a few minutes – you can knock up a pair for your whole family (even your cat?). Instructions can be found here.

3. Pom Pom Tassel Bookmarks
diy pom pom bookmarks
How cute are these?! If you can make a mean pom pom you can whip a couple of these up in no time. Get the tutorial here (ps – it’s in Finnish, but the pictures are more than enough to show you what to do).

4. Homemade Soap
diy soap
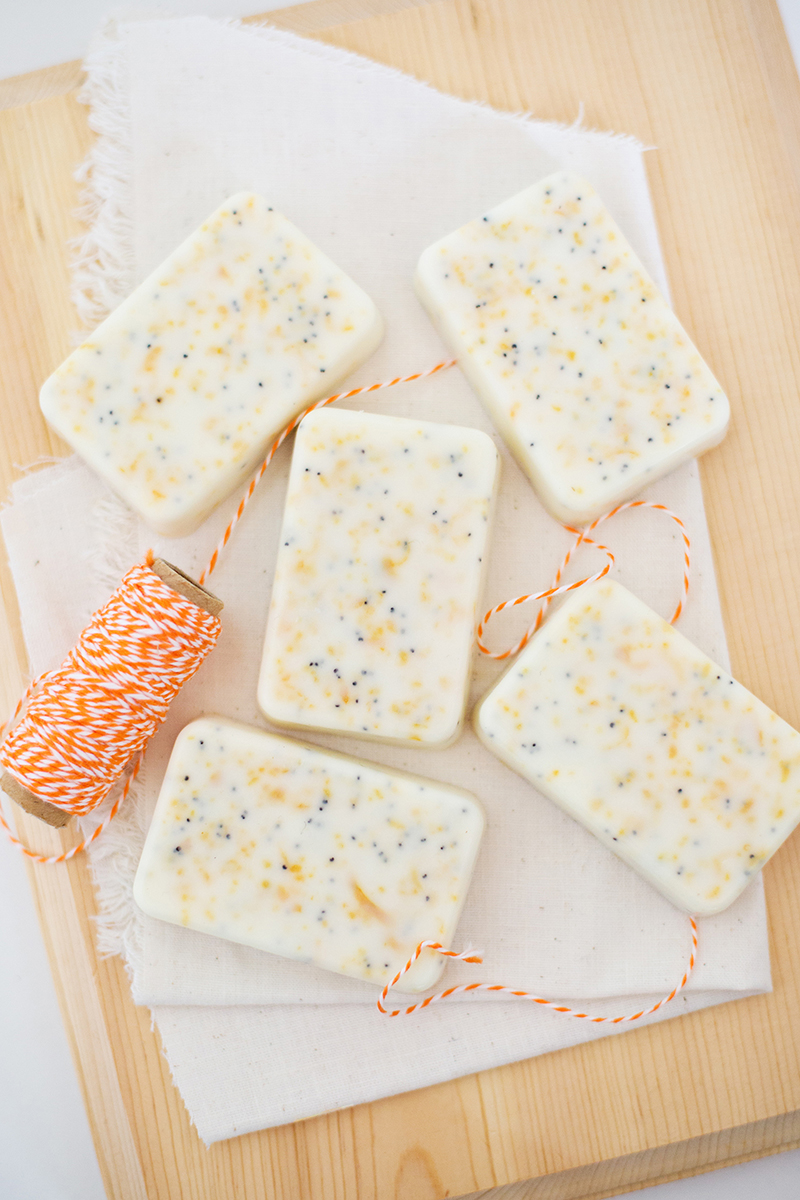
I want to know how much the fancy soap shops make at Christmastime. Save yourself a packet by making your own – invest in a good quality base and add whatever you like. Here’s a nice recipe for grapefruit and poppy seed.

5. Notebook Tote Bag
notebooktote
So cute and clever! All it takes to turn a boring old tote bag into a portable notebook book bag are a couple of rolls of thread and a sewing machine. Get the instructions here.

6. Pocket hand warmers
hand-warmer
It’s getting a bit nippy outside, so warm your mitts with these easy-peasy DIY hand warmers, using only material scraps and rice. Pop them in your jumper mittens for maximum toastiness! Instructions here.

7. Sharpie + Mug = ultimate DIY
Sharpie mug
Of course, if you’re looking for the ultimate in easy DIYs, then all you need is a plain mug and a sharpie. These bad boys have been all over Pinterest for a while now; make it festive by adding a personal message and tying up in some nice cellophane with some hot chocolate and a bag of mini marshmallows. Get the instructions here, with some useful tips here.

So there you go! Super easy tutorials for a DIY Christmas. Have you got any favourite winter projects? Let me know!

Image credits:
1. See Kate Sew
2. A Beautiful Mess
3. Projektila
4. A Beautiful Mess
5. Say Yes
6. Rae Ann Kelly
7. A Beautiful Mess

The Next Banksy?

One of the main reasons for starting this blog was to kick-start me into being creative with my spare time. Whilst the blog has grown and I have met some truly wonderful bloggers, been to some amazing events, and been lucky enough to even work with some of my favourite brands, I can’t help lamenting the fact that I haven’t done much on the creative front.

So when a lovely lady contacted me on behalf of Direct Blinds to tell me about a competition they were running to find ‘the next Banksy‘, I jumped at the opportunity. Sure, Direct Blinds may not be the the first company which comes to mind to design for, but by jove to they sell some pretty fancy blinds. Plus it gave me the chance to actually do some drawing for once – a kick up the bum that I needed, if you will.

art supplies

I was sent a fabulous box of paints and pencils to get cracking on my design, but being a bit of a shy artist and designer, I defaulted back to what I know – dip pen and ink. I utilised some beautiful new watercolour pencils, and began drawing what was in my head. I had a look at some of the Julie Dodsworth designs for inspiration, but to be honest, I was just drawing what came to mind.

teacups and teapots illustration

pansies illustration

boats illustration

pizza illustration

I started off fairly simple and straightforward; teapots and tea time things for a kitchen blind (including authentic ink splodge), pansies for a fancy vintage-style bedroom blind (turns out pansies are quite difficult to draw), boats for a nautical themed bathroom blind, and pizza because… well, pizza. I’ve caught the drawing bug again, and would love suggestions as to what to draw next. I’m definitely still learning, too, so if you’re an illustrator and you have some tips/constructive criticism then let me know!

Having a look at the other entries on the I’m certain I have no chance of winning! Nevertheless, I’m really grateful for this opportunity to pick up the pencils, paint and ink again. Who knows, you might be seeing more of my illustration on here in the future…

For more information on the Next Banksy Competition, head on over to the Direct Blinds website. Enter on Twitter, Facebook or Instagram using the tag #makemeadesigner. You’ve got just over a week to enter – the competition closes on 21st November. Good luck!

Posted in craft / Tagged competition, direct blinds, illustration, sponsored / 2 Comments

Christmas Craft Events

Close up of ribbon, string and shapes

Calling all you crafty types, vintage coveters, knitting wizards and crochet dabblers – here we have a definitive list of upcoming craft, vintage and handmade events around the country during the festive period, sure to get your Christmas vibe on and discover some treasures to pop in your loved one’s stockings!

Even more exciting is the fact that this handy little guide was compiled with a little help from yours truly. Some of these events have sadly already passed, but there are loads of upcoming events to get stuck in to! Try and guess which ones I picked out…

christmas craft calendar UK | Lily Doughball UK Lifestyle Blog

A special shout out goes to the Speigeltent Christmas Market, it’s my absolute favourite to go and visit every year, and it will be returning to the Harbourside this year on 28th November. It’s guaranteed to get you in the festive spirit, and I blogged all about it last year.

Which Christmassy craft events have you got lined up for this year?

{First image via ImageSource, Calendar via Chums}

Posted in craft / Tagged , Christmas, Craft, craft fair, sponsored / 2 Comments

Steampunk Crafting with Sugru

Last weekend, myself and the boy travelled back to my home town of Cheltenham to attend a very special wedding. Special, not just for the lovely bride and groom involved, but this wedding had a very specific theme, and that theme was steampunk. Steampunk is a blend of all things Victorian and industrial with a little sprinkling of sci-fi. Think Alan Moore’s The League of Extraordinary Gentlemen, Martin Scorcese’s ‘Hugo’, and everyone’s favourite box office flop ‘Van Helsing’, and you’re just about there.

I’d got my dress sorted a few weeks before (£20 eBay bargain) but needed something to make my outfit more authentic, leaning more towards steampunk and less towards ‘generic Victorian schoolmistress’. There were five of us in total going as a group, so we popped round my friend Jude’s house and pooled our creative ideas into creating some steampunk-inspired accessories.

A few weeks prior to this, I received an email from a company called Sugru, asking if I would like to try some of what they make for some up and coming crafty projects I may have up my sleeve. I was intrigued, and hot-footed it over to their website to find out what they’re all about. Turns out, they make this magical putty self-setting rubber stuff, with about a billion-and-one different uses.

steampunk jewellery, made with Sugru | Lily Doughball, UK Lifestyle Blog

steampunk jewellery, made with Sugru | Lily Doughball, UK Lifestyle Blog

steampunk jewellery, made with Sugru | Lily Doughball, UK Lifestyle Blog

steampunk jewellery, made with Sugru | Lily Doughball, UK Lifestyle Blog

Naturally, I was pretty excited when it popped through my door. They sent me two multi packs, with little individually wrapped parcels of Sugru in various colours, just waiting for whatever creative uses I may have for it. My initial idea was to mould it into some cookie stamps, but on further inspection, Sugru isn’t food safe just yet, so decided to give that project a miss (another time, maybe!).

I was rather stumped as to how I could create something wonderful using this magic ingredient. Sure, I could mould some onto my pan handles and make them heat-resistant, but that wouldn’t really make for a great blog post. So when Jude suggested steampunk crafting evening, I knew this would be the perfect excuse to see how this bad boy works in a crafty situation.

steampunk jewellery, made with Sugru | Lily Doughball, UK Lifestyle Blog steampunk jewellery, made with Sugru | Lily Doughball, UK Lifestyle Blog steampunk jewellery, made with Sugru | Lily Doughball, UK Lifestyle Blog

Cogs play an integral role in steampunk attire. It’s one of those things which is synonymous with the whole ‘steampunk’ culture, as well as brown leather, goggles, and elaborate-looking weapons. We had a table full of watch cogs (so tinyyy), brooch backings, and a whole pile of Sugru. It was time to get our craft on.

The colours I received in my taster pack were red, yellow, blue, black and white. Don’t let this limit you though, as you can blend Sugru into whatever colour your heart desires, and there’s even a handy little guide on the pack to help you out. I took 60% yellow, 30% red, and 10% black, and began smushing until I had reached a very steampunk brown colour. One thing to note – Sugru is quite tacky, so I would remove any jewellery you may have on before starting. The best way to clean your hands after using it is to wipe it off with kitchen roll. I haven’t tried washing my hands after, but don’t forget to wash them before you begin!

steampunk jewellery, made with Sugru | Lily Doughball, UK Lifestyle Blog steampunk jewellery, made with Sugru | Lily Doughball, UK Lifestyle Blog

As soon as I started, I found it pretty difficult to stop. Soon, I had made two brooches, a couple of hair clips, and even a pair of little cog earrings! It was so easy to make them – all I did was squish a blob of Sugru onto my backing (earring, clip, pin, whatever) and begin spiking some cogs into it. The texture is quite soft to begin with, but it starts firming up the longer you leave it, unless you give it a bit of a smush to loosen it up a little. These took 24 hours to ‘cure’ and harden, so I left them in a safe place until they were ready to wear.

steampunk jewellery, made with Sugru | Lily Doughball, UK Lifestyle Blog

As you can see, the back isn’t the prettiest thing to look at, but demonstrates how you simply press it into the Sugru, and secure it a bit by coaxing some of the putty over the sides. When it had hardened, everything stayed in place brilliantly, there were no broken bits all day (except when I dropped one of my earrings and accidentally trod on it :( wahhh).

The possibilies with Sugru really are limitless. Not only can you use it for crafting cosplay accessories, but it has 101 uses around the home – fixing cables, protecting your phone from bumps, even mending broken bits on your car! A pack like mine costs £12.99, and I still have a whole bunch left, just waiting for my next project.

What would you craft out of Sugru?

Posted in craft / Tagged cosplay, Craft, DIY, jewellery making, sponsored, steampunk, sugru / 12 Comments

DIY Flower Fairy Lights

fairy lights

A craft, yay! It seems like an absolute age since I have done anything creative, so when I was contacted by a lovely lady on behalf of Country Baskets, asking if I would like to write a tutorial, how could I say no?

I had a few ideas, and had exhausted my trying to think of a quick and easy project. I had seen a while back, and thought it a genius use of cute cupcake cases – imagine the possibilites! I also liked the idea because shortly before the new year I had been eyeing some gorgeous paper flower lights up in a shop in Bristol, then winced slightly at the price (about 40 of the Queens). I began some research into other ways in which people had interpreted this simple idea, and set about creating my own. This honestly is the most straightforward and quick DIY to jazz up those old Christmas lights.

country baskets tissue paper

I have been in a bit of a peach-and-orange mood of late, and have found myself drawn to these particular colours (such as my mental but completely awesome orange Lime Crime lippy) and so chose two rolls of tissue paper to complete my craft – Orange* and Peach*. I have to admit I was pretty stunned at firstly how many colour options are on the website, but also how quickly they arrived; I was a bit confused when I had a note saying I had a parcel the day after I ordered it! 

The price was also incredibly reasonable – a massive roll of 48 sheets is only a mere £2.37 – and these two rolls strung a 100 string of fairy lights and I still have loads left over. As well as a vast selection of coloured papers they have quite literally hundreds of other bits and bobs at wholesale prices – if you’re a crafty bod you don’t really need an excuse to stock up your craft cupboard!

diy flower lights you will need

To complete this craft you will need:

  • Tissue paper (either one colour, or a multitude of colours)
  • Old fairy lights (mine were from Asda, about £9)
  • A glue stick
  • Scissors
  • Tape (I used washi tape, but you don’t have to)

image

Step one is to cut a few layers of your tissue paper into squares, approx 4×4 inches. If you’re anything like me, you don’t have to be mega precise with this, I just did it by eye and I think it adds a nice rustic charm to the final piece. However, if you want to get a ruler out and be precise, then that is also fine. This size determines the size of your flower, so if you want to have a play around then feel free – ginormous ones might look quite awesome!

image

When you’ve got a few bundles of tissue cut into squares, take one pile and fold in half to make a rectangle, then half again to make a square, then join the straight edges so you have a triangle, such as the one above. If you find the tissue is a bit difficult to fold into this shape you most probably have been a bit too keen and have got too many sheets in your bundle, thin it out a bit and you should be peachy (ha!).

image

Next, we take our scissors and snip snip the top away in a curvy shape to make the petals. Again, feel free to experiment at this point – I accidentally made a bit of a pointy petal edge and it turned out pretty well, it looked like a lotus flower or something of the sort.

image

When you have made a curve, snip the point of the triangle off but not too much! This makes the hole which your light will poke through – it’s always better to keep it small as you can always make it bigger at a later stage, but if it’s too big to begin with then we are back to square one!

image

Open ‘er up and you will have a lovely bunch of little billowy tissue flowers! Smashing.

image

The next phase is the time consuming one. But fear not, you will have a lovely beautiful hand made thing at the end of it, so it’s best to persevere, I promise. Thread your lights through the little hole, making the hole a little bigger if you have to. My lights are fairly slender, but if you have the green Christmas tree variety they might need a little more persuasion.

At this point, if you have chosen to use two colours like me, or doubled up your tissue paper, you might want to add a teeny dab of glue between sheets just so they have something to cling onto each other with. Try not to get any glue near the lightbulb, stick it in the middle if you have to.

image

Flip the flower over so you can see the underneath and give the tissue a little pinch and a twist – it helps to keep things together, makes it easier to tape, and also makes a nice flower-y shape when you open it out.

image

image

Tape it up using a slender piece of whatever tape you desire – I didn’t happen to have any clear tape in the house, but I think the grey works really nicely with the orange! (Please excuse my chipped mani.)

Repeat for all lights – this is where a shorter string of lights will work in your favour, if you are impatient like me! I split my craft over a couple of evenings, and actually found it pretty therapeutic when I had worked out a system of cutting, shaping, snipping, poking, twisting, taping…

image image

fairy lights

Et voila! You have a lovely inexpensive and beautiful hand made addition to your living room (or wherever takes your fancy). I love the fireplace in our new house, and have used my new fairy lights as an excuse to show it off!

Don’t forget – it’s Mother’s Day at the end of this month, and what better way to say ‘thanks for all the dinner money and lifts to the pub and looking after me when I’m pretending to be poorly from school’ than a nice homemade present? These lights don’t cost the Earth, and I’m sure any mam would appreciate them.

Follow on Bloglovin

Posted in craft / Tagged country baskets, Craft, DIY, fairy lights, mothers day / 8 Comments

Briswool

Jeez Louise, the busy week continues! Hence the radio silence on the blog – we’re leaving the boat and it’s proving very difficult to find a new flat. The search continues.

Any who, I managed to find time a couple of weeks ago to attend a knitting workshop at the M Shed, to participate in a new community craft project called Briswool.

20140208-130957.jpg

This genius project is the brainchild of Vicky Harrison, who runs the fabulous Paper Village shop on North Street. The idea is to create a completely crafted model of Bristol – complete with true Bristolian landmarks like Ashton Court and the Thekla – all made by creative members of the community.

The model will be entirely made of textiles, either knitted, crocheted or needle felted. If you want to get involved you have until the end of March to crochet or felt or knit your Bristol creations – the final piece will be exhibited at M Shed amongst other places; there’s even talk of a documentary in the pipeline!

20140209-111234.jpg

We were knitting little multicoloured Totterdown houses at our workshop, and whilst working away we got a delivery of pale coloured houses all knitted by one lady, which will be making up the Cliftonwood area. I’ve included a pattern at the end of this post for shops – same as the houses but with a taller space for the shop name, of course!

It’s not just shops and houses that are needed, there’s room for boats, trees, even balloons! If you want more information then you can contact Vicky – – or pop into her shop Paper Village, just up from the Hen and Chicken on North Street.

So what are you waiting for Bristolians? Get involved!

//

Bristol shop – Knitting Pattern

Materials
1 pair of 3.50 needles (if you use smaller or larger keep an eye on your tension and gauge)
1 50 gram ball of DK yarn for (house colour)
1 small ball of white for shop sign
1 small ball of DK yarn (roof colour)
darning/wool needle

Variety of threads/wool for decorating shop with windows, doors and drain pipes

Tension
10 stitches by 16 rows
5 by 5 cm square
2 by 2 inch
Stocking stitch

Size of shop
6 by 12 by 19 cm when stuffed

Abbreviations:
Sts – Stitches
K – Knit
P – Purl
CO – Cast off

Pattern:
Cast on 28 Sts, preferably cable cast on.

Row 1: K row
Row 2: P row. This sets stocking stitch.
Continue in stocking stitch for 30 rows or until it measures 10 cm, end wrong side facing. Change to white yarn from shop sign continue for 7 rows or when measures 2cm whole shop front should measure 12cm.

Add in new colour for the roof P 1 row and then K 1 row this sets stocking Stitch continue for 3 rows. Every 4th row P 1 row. (P1 row, Knit 1 row, P1 row and Purl 1 row) Continue for a total of 28 rows or until the roof measures 8 ½ cm ending on a P row on right side facing. Break off roof colour.

Bring in main colour for the back of the shop.
K 1 row and then P 1 row.
Continue in stocking stitch for 37 rows or until it measures 12 cm, end wrong side facing. (purl row)

You are now going to knit the bottom of the house
Change the front to purl side facing by purling a knit row and then continue in Stocking stitch with wrong side front facing. Continue for a total of 26 rows or until the bottom measures 8 ½ cm. CO all sts.

Sides of the shop. Repeat 2 times.

Cast on 22 Sts in cable cast on.
1st row: k1, p1, k18, p1, k1
2nd row: p1, k1, p18, k1, p1 this sets the pattern for the rest of the piece.
Continue for 30 rows or until it measures 10 cm. The purl side is the side that should be right side facing when sewing up the house.
CO all Sts.

Sew up the shop using mattress stitch leaving a gap for the house to be stuffed. Stuff, sew up last little bit and then decorate. Yay you’ve got a sweet little house! Don’t forget the sides are purl side facing out.
This a a basic pattern for a shop please feel free to adapt. I’d love to see your shops. If you have any suggestions for how the pattern could improve please let me know.
For questions or help email Elise:

This pattern is for use of Briswool and is copyright Elise Hurcombe

Posted in craft / Tagged , briswool, Craft, knitting, m shed / 10 Comments

Inspiration // CrossBitchez

20140125-122948.jpg

In search of crafty inspiration, a friend of mine pointed me in the direction of a genius embroidery collective named CrossBitchez. Rarely do I get as animated as I did when I trawled their and Cargo Collective pages – you may well know I absolutely love the marriage of the innocent medium of embroidery with another of my favourite things to do, swearing. I had a play with this idea a while back with one of my submissions for the Creative Initiative, but my stitchin’ don’t come close to this.

I think everyone harbours a love for hip hop, and what the CrossBitchez collective aims to do, according to their Facebook is “represent a movement for social justice, campaigning for the universal right to live the Hip Hop lifestyle. Using embroidery, CrossBitchez provide the platform for us all to git bitches and make money” – and hey, if that isn’t a motto to live your life by, I don’t know what is.

I think the tea cosy is my favourite, partly because of my love for Snoop and that song, but also the fact that tea (especially from a teapot) is such a sweet old lady thing to do, and so the addition of the lyrics and the reference to that song subverts it in a way which just can’t help but make you smile. I’ve already got a few ideas bouncing around in my head for what I might stitch up next.

Watch this space, bitchez.

Follow on Bloglovin

Posted in craft / Tagged Craft, cross stitch, crossbitchez, freehand embroidery, inspiration / 6 Comments

Damn Fine Coffee

I’ve had an obsession of late.

There’s always a list as long as my arm of TV shows that myself and Tom have been meaning to watch, and top of it for a long time was Twin Peaks. After the New Year I had the rest of the week off, and so instead of doing anything useful like jobs around the house, we decided to dedicate our free time to watching it.

For the uninitiated, Twin Peaks is a TV series which ran from the year of my birth (or to be more specific, the best year ever, 1990) until the middle of 1991, and centres around a murder which takes place in a small town in the US, and an eccentric FBI agent who comes to investigate the situation. If you haven’t done so already, I urge you to watch at least the first season, and try not to be hooked. There’s something about the characters which make it so interesting – the mix of people in the show make it easy for the tone to shift from menacing to surreal to downright hilarious. Plus it just looks so cool – nothing about the show looks dated at all, and it’s over 20 years old.

The best of these characters is of course Special Agent Dale Cooper. He’s a bit of an oddbod, but is the coolest amongst them for his sharp FBI suit and tie, his trademark thumbs up, and his obsession with pie, donuts and an overwhelming adoration of coffee. (Plus, he’s played by the guy from the Flintstones! That was totally my favourite movie as a kid). He has a dictaphone into which he dictates his life, his theories and his findings, to a mysterious person named Diane.

kate rowland illustration

So GUESS HOW EXCITED I WAS WHEN I SAW THIS.

How awesome is it?! It’s made by the super talented Kate Rowland, whose Etsy store I discovered some months ago, when I bought these little wooden heart earrings. She takes most of her inspiration from cult TV shows such as Twin Peaks amongst others, and her shop contains tons of goodies to make a nerdy fangirls heart skip a beat. Such as these beauties – Enid from Ghost World, The Nights Watch from Game of Thrones, and who doesn’t obsess over Breaking Bad?

kate rowland illustration

1 // 2 // 3

My own little brooch arrived in the cutest little green bundle, with a hand-drawn sticker sealing it shut. I like little details like this, I’m somewhat of a packaging pervert and this cheered up my slow moving Tuesday morning. My studio work-buddy had bought two which arrived at the same time, and both of his were wrapped in Twin Peaks packaging too. I had intended to give this to Tom as a gift, but I couldn’t help but rip it open as soon as it arrived.

twin peaks sticker

kate rowland illustration

Laser cut items fascinate me – I had an induction on a laser cutter once and it’s amazing how much detail it picks up. It’s as if she has taken a hot pen and etched the design into it herself. Although that’s kind of what she has done, in a way! This is of course Agent Coop’s iconic dictaphone. I haven’t worn it out yet but I’m looking forward to talking to whoever notices it and gets the reference. I love it when nerdy conversation is sparked by sharing a reference to something. Despite not wearing it down the pub, I did get a chance to snatch it from the packaging and wear it around the studio all day.

kate-rowland-twin-peaks-4

Here I am enjoying a cup of damn fine coffee. I think the wooden-ness of this cute little brooch suits the hue of my tartan scarf, so maybe I will keep it for myself, after all.

If you are in any doubt as to the greatness of Twin Peaks, it can also teach you valuable life lessons. Here Agent Cooper is schooling the Sheriff on a pretty good day-to-day rule which I could learn to live by:


But remember, kids: the owls are not what they seem.

Follow on Bloglovin

Posted in craft, fashion / Tagged agent cooper, diane, etsy, fangirl, kate rowland illustration, laser cut illustration, twin peaks / 12 Comments